I saw a great presentation by Philip Lindsay on a technology that he had developed called 'Handbag' at the Android Open conference last month.
Handbag is another way to write the code part of an Android Accessory. That is to link an Android phone that supports Open Accessory to an Arduino. The Arduino part might be an Arduino Uno with a USB Host shield, or a specialist board such as the Freetronics USBDroid board that I reviewed a few weeks ago (http://srmonk.blogspot.com/2011/10/freetronics-usb-droid-review.html).
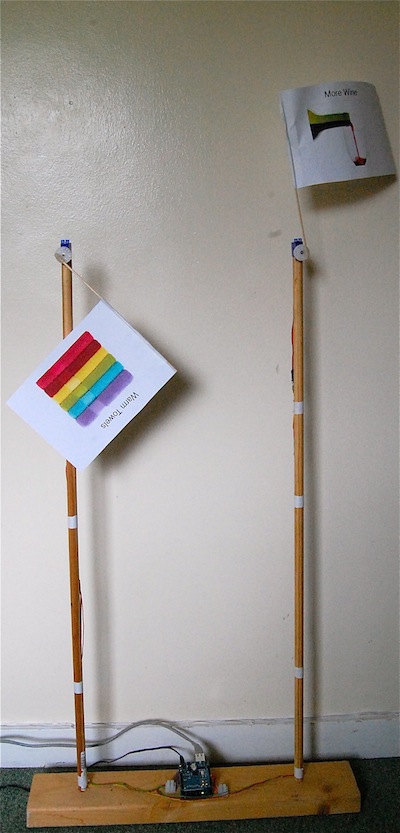
I decided to try out Handbag to control a couple of servos that raise little paper flags in a project I developed for my book 'Arduino + Android Projects for the Evil Genius'. In the book, the servos were attached to an Arduino / Ethernet shield combination. In this case, I decided to attach them to a USBDroid board, although an Uno and USB host shield would work just as well.
 Philip's stroke of genius was to realise that if the Arduino is acting as the host in the USB relationship (as it does) then it might as well be in charge of telling the Android phone what to do. In other words, there is zero programming to be done on the Android side, instead you put code in your Arduino script that tells a general purpose Android app what to display in its UI and to do when someone presses a button etc.
I'll just say that again! Genius!
Step 1. Downloading the Handbag App onto my Android Phone.
So, my first task was to fetch the general purpose Handbag app down for my Android phone.
Its not on the Android Market, so I downloaded the APK binary from here. For your convenience here is a QR code for it.

Note that because this App is not from the Market, you have to allow your phone to download apps from 'Unknown Sources'. You will find this in Settings->Applications.
When the App starts, it should look like this.. Philip, I stole that image from your web site - hope thats okay.

Step 2. Setup the Arduino Environment
If you haven't used the Android ADK, then you will need to install the necessary libraries onto your Arduino IDE. To do this, you just unzip the library files here into your libraries folder which will be in the Arduino folder in your documents folder, so on a Mac thats in ~/Documents/Arduino. If there isn't a 'libraries' folder there, make one.
Then unzip this file and copy its 'Handbag' folder into the libraries folder.
You will also need to install the ADK library and a modified USB host library. These live in these two locations.
Note that if you are using a Uno and USB host shield or a USB Droid board then, when installing the ADK (first link) don't install the USB Host library that comes with the ADK download, use the one that come in the second link instead.
Step 3. Upload this minimal sketch to your Uno or USBDroid.
You will also need to attach an LED and resistor to pin 4, as shown below.

Initially I tried to use 13 as the LED pin to make use of the built-in LED, but that seems to be reserved for use somewhere, so I had to resort to using an LED on pin 4.
Anyway, here is the minimal sketch.
#include <Max3421e.h>
#include <Usb.h>
#include <AndroidAccessory.h>
#include "Handbag.h"
#define ledPin 4
AndroidAccessory acc("rancidbacon.com",
"Handbag",
"Handbag (Arduino Board)",
"0.1",
"http://rancidbacon.com",
"0000000000000001");
HandbagApp Handbag(acc);
void setupHandbagUI()
{
Handbag.addLabel("Minimal Handbag Example");
Handbag.addButton("Toggle LED", toggleLED);
}
void setup()
{
pinMode(ledPin, OUTPUT);
Handbag.begin(setupHandbagUI);
}
void loop()
{
Handbag.refresh();
}
void toggleLED()
{
digitalWrite(ledPin, !digitalRead(ledPin));
}

Handbag is another way to write the code part of an Android Accessory. That is to link an Android phone that supports Open Accessory to an Arduino. The Arduino part might be an Arduino Uno with a USB Host shield, or a specialist board such as the Freetronics USBDroid board that I reviewed a few weeks ago (http://srmonk.blogspot.com/2011/10/freetronics-usb-droid-review.html).
I decided to try out Handbag to control a couple of servos that raise little paper flags in a project I developed for my book 'Arduino + Android Projects for the Evil Genius'. In the book, the servos were attached to an Arduino / Ethernet shield combination. In this case, I decided to attach them to a USBDroid board, although an Uno and USB host shield would work just as well.
I'll just say that again! Genius!
Step 1. Downloading the Handbag App onto my Android Phone.
So, my first task was to fetch the general purpose Handbag app down for my Android phone.
Its not on the Android Market, so I downloaded the APK binary from here. For your convenience here is a QR code for it.
Note that because this App is not from the Market, you have to allow your phone to download apps from 'Unknown Sources'. You will find this in Settings->Applications.
When the App starts, it should look like this.. Philip, I stole that image from your web site - hope thats okay.

Step 2. Setup the Arduino Environment
If you haven't used the Android ADK, then you will need to install the necessary libraries onto your Arduino IDE. To do this, you just unzip the library files here into your libraries folder which will be in the Arduino folder in your documents folder, so on a Mac thats in ~/Documents/Arduino. If there isn't a 'libraries' folder there, make one.
Then unzip this file and copy its 'Handbag' folder into the libraries folder.
You will also need to install the ADK library and a modified USB host library. These live in these two locations.
- http://developer.android.com/guide/topics/usb/adk.html#installing.
- http://www.circuitsathome.com/mcu/programming/android_adk_compatible_usb_host_library_release
Note that if you are using a Uno and USB host shield or a USB Droid board then, when installing the ADK (first link) don't install the USB Host library that comes with the ADK download, use the one that come in the second link instead.
Step 3. Upload this minimal sketch to your Uno or USBDroid.
You will also need to attach an LED and resistor to pin 4, as shown below.

Anyway, here is the minimal sketch.
#include <Max3421e.h>
#include <Usb.h>
#include <AndroidAccessory.h>
#include "Handbag.h"
#define ledPin 4
AndroidAccessory acc("rancidbacon.com",
"Handbag",
"Handbag (Arduino Board)",
"0.1",
"http://rancidbacon.com",
"0000000000000001");
HandbagApp Handbag(acc);
void setupHandbagUI()
{
Handbag.addLabel("Minimal Handbag Example");
Handbag.addButton("Toggle LED", toggleLED);
}
void setup()
{
pinMode(ledPin, OUTPUT);
Handbag.begin(setupHandbagUI);
}
void loop()
{
Handbag.refresh();
}
void toggleLED()
{
digitalWrite(ledPin, !digitalRead(ledPin));
}
Lets just pause for a moment. We have 37 lines of code here. If you want to see the equivalent is writing it long hand in Android, you could add at least one zero to the lines of code.
Have a quick read through the code above. Its really very easy to see how to use Handbag.
So, lets change my flags code to use Handbag.
Here is the wiring diagram, it shows an Ethernet Board, but its the same pin numbers as an Uno or USB Droid.

And here is the sketch:
#include <Servo.h>
#include <Max3421e.h>
#include <Usb.h>
#include <AndroidAccessory.h>
#include "Handbag.h"
#define REQUEST_BUFFER_SIZE 700
#define MIN_ANGLE 30
#define MAX_ANGLE 175
// pins 10, 11, 12 and 13 used by Ethernet
#define SERVO_1_PIN 2
#define SERVO_2_PIN 3
Servo servo1;
Servo servo2;
int servo1pos = MIN_ANGLE;
int servo2pos = MIN_ANGLE;
AndroidAccessory acc("rancidbacon.com",
"Handbag",
"Handbag (Arduino Board)",
"0.1",
"http://rancidbacon.com",
"0000000000000001");
HandbagApp Handbag(acc);
void setupHandbagUI()
{
Handbag.addLabel("Evil Genius Flags");
Handbag.addButton("Raise Flag 1", raiseFlag1);
Handbag.addButton("Lower Flag 1", lowerFlag1);
Handbag.addButton("Raise Flag 2", raiseFlag2);
Handbag.addButton("Lower Flag 2", lowerFlag2);
}
void setup()
{
Handbag.begin(setupHandbagUI);
servo1.attach(SERVO_1_PIN);
servo2.attach(SERVO_2_PIN);
}
void loop()
{
Handbag.refresh();
servo1.write(servo1pos);
servo2.write(servo2pos);
delay(100);
}
void raiseFlag1()
{
servo1pos = MAX_ANGLE;
}
void lowerFlag1()
{
servo1pos = MIN_ANGLE;
}
void raiseFlag2()
{
servo2pos = MAX_ANGLE;
}
void lowerFlag2()
{
servo2pos = MIN_ANGLE;
}
And here is a short video of the flags in action. It all worked like a dream.
In short, Handbag is a wonderfully simple way to make Android accessories without having to learn large amounts about Java programming and the Android libraries.
About the Author
These are my books. Click on the image below to find out more about them.

About the Author
These are my books. Click on the image below to find out more about them.
13 comments:
Thank You,
Proof USBDroid works, Now for sum fun
what version of arudino are you running because every time i try to verfy and compile the sketch or upload it, it comes up with
hundreds of error messages but i can not post them due to the word limt on comments
no worries got it working
i just used arudino 22 instead of arudino 1.0 thx
great tutorial btw
Thats good, thanks Chris.
Philip - Handbag developer - any chance of an update for Arduino 1.0?
Si.
wouldn't a merge of the concept behind Amarino and Handbag create a useful way of integrating Android and Arduino wirelessly (Via bluetooth) without having to get an ADK combatible Arduino?
Nice idea Grant. I guess the main difficulty to overcome would be establishing the link. Handbag uses Open Accessory and the USB connection is detected by the phone and launches the appropriate app for the accessory (Arduino) just attached.
Replica handbags are available in great variety which provide unique and attractive look. Replica bags are luxurious and available at affordable rates.
I have never think it is possible. I think Arduino is the product width of Android, but exactly don't know about both to which company do they belong.
Just use ArduinoCommander (https://market.android.com/details?id=name.antonsmirnov.android.arduinocommander), if you have Bluetooth shield.
I had a lot of fun playing around with the Handbag app. Here is a video of my project in which I control a DC motor using Handbag and an Arduino ADK. https://www.youtube.com/watch?v=JpINJ9CH3Z8
I had a lot of fun doing a Handbag project where I control a DC motor using the Handbag App. See video here
https://www.youtube.com/watch?v=JpINJ9CH3Z8
Check out ArduinoDroid - Arduino IDE for Android: https://play.google.com/store/apps/details?id=name.antonsmirnov.android.arduinodroid
Thanks for sharing I was looking for a good tutorial and this one was the best ;)
Android Development
Post a Comment